Affichage des articles dont le libellé est fashion design. Afficher tous les articles

The Sketchbook

The Sketchbook

For an update of my life: I have just recently finished all of my exams for high school and I am officially done with my 13 years of schooling. The feeling is great, but there's a sense of emptiness. Perhaps, it's the fact that there's nothing else that I can really do. My mornings used to be so occupied with having to force myself to wake up early to go to school. Now it's waking up in the afternoon and reducing my productivity.
I decided I'd steer clear from that sort of black hole that could be the end of me. I haven't been constant with updating this blog or my other blog due to the busy month I had because of exams. So, I want to slide back into my routine or schedule to post every Friday. That allows me to get out of bed early at least once a week to create fashion sketches or illustrations to post here.

The Sketchbook

The Sketchbook

I thought I'd share some quick sketches of designs that I've just recently created. I figured since I wouldn't be able to turn every design I come up with into a fashion illustration, I might as well keep them nice and simple in a sketchbook.
I'm a bit worried though that people will steal these designs. That's probably the only downside of the internet. Nothing's completely safe. 
However, I still wanted to share this with you guys because it's an informal illustration - just raw ideas coming out of my head. There are no facial features or intricate details. There's just the pencil on paper that accurately captures the movement of my hands and my thinking process. These are simple shapes that create the starting point of a fashion design.

Philippine Culture

Philippine Culture


Media: Faber-Castell pencils, Pilot G-TEC 0.3mm black fineliner and Quill white A4 Multiboard
Time: 1 hour and 30 minutes

For my Visual Communication and Design class, we were told to create two folios and it was completely up to us what we wanted to design in each folio. I chose fashion design for folio 1 and architecture in folio 2. It was a fun project, but I wish I had more time to make my folio better. It's sad to say that the fun only really lasted a while. Once the teacher confirmed the date of our submission, it was a tragic journey from there on.
This is one of the three designs I created. It was inspired by the Philippine culture with the Santo Niño festivals and celebrations. I was influenced by the costumes that the dancers wore which reflected the religious beliefs of most Filipinos. I've been in love with the combination of red and yellow/gold for a while now, and I couldn't resist not using the combination as the colour palette of this design.
I also added some current fashion trends that I am in love with at the moment such as the black stiletto heels with ankle straps, as well as the milkmaid braids. I would definitely love to see this design come to life.

Stained Glass Collection - Design 3

Stained Glass Collection

Media: Copic Markers, Faber-Castell pencils, Pilot G-TEC black fineliner and Quill white A4 Multiboard
Time: 2 hours

This is by far the longest time I have ever taken to draw a complete fashion illustration. I guess it's been a while and I lacked practice.
The collection hasn't been completely abandoned, although finishing it is taking longer than expected. It was in early May this year when I started, and I swore I'd finish it in like a month.
I'm determined to finish this collection since there were a few ones that I abandoned, for example, the Queen Couture Collection. I still like to tell myself from time to time that I just took a break from it - a long break - and I'm going to finish it in the future. However, it's an undeniable fact that there's no way I'm really going to complete that collection. The idea was great at that moment, and I still think it has potential, but none of the dresses I designed fit what I had initially imagined the collection to look like. (That's a whole different story though) For this one, I'm working my way through to completing it, and it might be taking more time than necessary, but as long as I finish it.

Hair

Drawing Hair

There are a few guides to consider when drawing the hair. First off, know the direction of the hair. It naturally falls downwards, however, it's possible to create artistic hairstyles which a lot of fashion designers definitely incorporate to their runway collections. Always take note of gravity and other forces that act on the hair. For example, it might be pinned to one side, or you might choose a simple ponytail hairstyle.
The three main guides are:
Point, which is also called the growth point. It makes it easier to draw strands of hair that start from that point. This is useful for drawing the fringe or when hair is secured by a hair tie.
Parting is self explanatory. Different from what I said before, hair doesn't actually grow on one area or point on the head.
Hairline, which is the transition of the hair to the skin. This area of the head should not be a harsh line but a smooth blend, so it's best to use flicking motions.

Male

Male
Media: Copic Ciao Markers, Faber-Castell pencils, Pilot G-TEC 0.3mm black fineliner and Quill white A4 Multiboard
Time: 1 hour and 30 minutes

It's a rare thing for me to draw a male fashion illustration since first of all, I've been criticized that my male models look way too feminine and second, I have little to no clue about the male fashion world. I only know one or two current trends for men, and because of that, I had a hard time designing the outfit, concerned that it might end up looking like clothes more suited for women than for men.
I admit, I need a lot of practice with male faces, with the body and with the clothes they wear. Obviously there is a distinct feature in garments that are for men and not for women, and vise-versa. I am yet to do some studying and further research to enhance my knowledge and skills.
Meanwhile, I decided to give it a practice since I've been asked quite a few times to create a tutorial on the male figure. I would like to, but I still have a lot to learn on that area, and unless I am confident on drawing men, I won't be making that tutorial yet.

Designing My Formal Dress

Designing my Formal Dress

With the materials ready, I create a simple sketch of the design I want for my formal dress. There's no need for me to create a fully rendered fashion illustration since I know that there might be a few changes made to the initial design.

With the design in mind, I use the mannequin and some paper to create the pattern for my garment. This was my first time to create my own pattern using a mannequin. So many times, I've imagined the process in my head, yet I wasn't completely confident. I had doubts when I started but by the end of it, I was pleased with the outcome.


After finishing the pattern pieces for both the front and the back of my dress, I laid them down onto the red fabric, pinned them down and cut the pattern pieces. Considering that the mannequin was slightly bigger than me, I didn't add any seam allowance.
I am trying to train myself to create more patterns for every piece of clothing I make since I can use that as a tool to teach myself more advance ways to create garments.


I usually pin all the fabric pieces on the mannequin first to get a glimpse of the final outcome. Once I'm satisfied, I start sewing all the pieces together. This process can be both fun and frustrating. I am self-taught and a beginner, therefore my sewing skills are still basic.
I can tell you that I created the bodice of the dress about three times. Since the fabric was stretchy, the edges would curl and as I tried to add the gold details, the structure of the top became slightly deformed.

With my initial design, I wanted to add gold sequins on the front of the top. However, when I tried that (I tried three times and failed three times) it came out completely different from how I pictured it in my head. With the consultation of my older brother that "simple is simply better", I decided I'd scrap the sequin idea and create a minimalistic design using only a gold trim

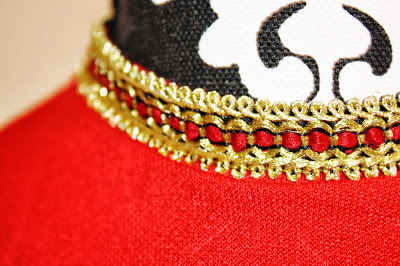
I attached the gold trim to the bodice of the dress and surprisingly, it turned out better. Initially, I draped the trim over the mannequin to create various designs using the material. I still really wanted gold to almost cover the entire top, but in the end I settled for a simplistic design.


Seeing that the material for the skirt of the dress was sheer, I wanted to create another skirt to be placed underneath the dress. So I had to create a pattern and it took me two tries to finalize the pattern and create the tight fitted skirt. The first try was a little too short for my liking. I didn't change it for a while since I became kind of lazy. I had to wait for that burst of inspiration and energy to finally remove the skirt and create another longer skirt for the dress.
Finally, everything came nicely together. This is only the general idea of the finished dress. There are still some adjustments and other details that I want to perfect.
I will eventually post the dress, but I haven't found the perfect shoes to suit the design, so while I'm still searching, the dress finished, but not quite complete.

Formal Dress

Formal Dress

Media: Faber-Castell pencils, Pilot G-TEC 0.3mm black fineliner and Quill white A4 Multiboard
Time: 1 hour and 30 minutes

My friend asked me to make her formal dress since I've made my own (which I will post on here soon enough). This is the illustration of the dress that we agreed on, yet we made a few changes.
This is a style of fashion illustration that I'd normally never explore since it requires more time and effort put into drawing two figures and colouring two fashion illustrations. I've done this before, but swore never to do it again, yet here I am with this illustration.
As expected, I'm not completely satisfied with the outcome. I got tired towards the end which ruined the colour of the second dress (left). So, with that said, I will never return to this style, but if I do, it would only be for a great reason.

Jumpsuit

Jumpsuit

Media: Faber-Castell pencils, Pilot G-TEC 0.3mm black fineliner and Quill white A4 Multiboard
Time: 1 hour and 20 minutes

The materials you use do not necessarily determine your skills. An artist who has been practicing for many years can use a cheap medium and still create a beautiful painting/drawing. They utilise the materials they have.
I wasn't born with a million dollars in my pocket. I'm not rich nor am I spoilt. I was, however, fortunate enough to earn money through a commission which I used to by my Copic markers. Aside from that expensive brand of graphic markers, I like to buy cheap art materials that can be found in the dollar store. My local dollar store has a wide variety of mart materials from colouring pencils, charcoal to acrylic and oil paints. Since I still consider myself a beginner, I don't like to buy expensive mediums if I know I'm only going to experiment with it, unlike Copic markers which I know I'm going to use all the time.
With that said, I did this simple illustration using Faber-Castell 48 Classic Colour set which I bought from a school and office supply store. It cost me about $18 which is considerably inexpensive compared to other brands such as Prismacolor and even Faber-Castell Polychromos.

Stained Glass Collection - Design 2

Stained Glass Collection


Media: Copic Markers, Faber-Castell pencils, Pilot G-TEC black fineliner and Quill white A4 Multiboard
Time: 1 hour and 40 minutes

I am only on the second design of the collection and so far, it's been going great. It saddens me, however, that it's taking me what seems to be like forever to complete a single illustration. With the end of the first semester coming up, things need to be handed in and assessed. That means, exams.
I usually don't like to talk about exams and school on any of my social media accounts since it's such a cliché excuse when I haven't been able to update anything. I've used it so many times, even I don't want to hear about it any more, but things have been very hectic and stressful lately that I figured a short rant might just be able to calm me down.
I could wish for more time, however, I honestly just can't wait to finish the year.  In fact, I want time to go faster than the speed of light. The end of the year would mean the end of my high school life and a chance to start anew - to start fresh. Who knows what I'm going to be in the future, but I just know I won't ever be the same person I am today.

Designing My Formal Dress

Preparing the Tools

I begin with choosing the fabric that I want to use. Since I buy my fabrics from thrift stores or op shops, I have a very limited selection which is a disadvantage, but every time I go thrift shopping, I am always on the look out for any type fabrics that I like and see the potential for a future project.
I chose red fabrics because let's face it, it's my favourite colour. I also found this amazing printed fabric that looks very baroque which is the main inspiration and trend of my design. 


I then search craft stores for the other supplies I need such as for the embroidery of the dress. I also have a mannequin to assist with the fit of the dress and of course, a sewing machine.


Honestly, this mannequin is a size bit bigger than me which is disappointing since it's not adjustable. I got this from a craft store that had this as a special, fortunately I was a member which meant I was one of many people that received a coupon to purchase the mannequin more than 50% off. I've always wanted a mannequin to practice drapery as well as dressing the figure's form properly.


The sewing machine I have is a Toyota with 18 stitches including 4 button hole stitches. I don't have a serger which is a separate machine to finish off raw edges of the garment, but for this sewing machine, it includes a stitch that is very similar to the outcome of a serger, but it's still not as good.
After I have gathered all the materials and equipments that I'm going to use for the production of the dress design, I start to explore the design in more detail with the consideration of my abilities, knowledge, time and resources. In other words, I had to modify my design to be realistic to my situation.

Stained Glass Collection - Design 1

Stained Glass Collection

Media: Copic Markers, Faber-Castell pencils, Pilot G-TEC black fineliner and Quill white A4 Multiboard
Time: 1 hour and 20 minutes

I am currently working on a mini collection that I hopefully would expand into a bigger collection, but that depends on my progress. To be honest, I feel like a hipster saying that I used church windows and stained glass in a few of my old designs. I'm not saying that I invented this trend because I didn't. I guess people tend to find inspiration in the same places.
For this collection, I plan to use mosaic as the main print or pattern for the dresses. It's a different take on the Baroque trend since I feel like I've used the gold detailing on red or blue or black fabric too much that I don't feel so inspired by it, instead, I start to hate the trend. So I decided to take a different route with the Baroque prints. On the more high end side of fashion, this trend is very elegant that plays with simplistic patterns, however, in retail stores at my local mall that targets teenager girls, this trend contains very busy prints. I combined both of those characteristics in this design. Church windows as the print adds pops of colour to the dress but at the same time keeping it simplistic and minimal.
I'm not quite sold with the shoe design. I tried to steer away from my usual black platform heels, so I used a burgundy colour that works the colour blocking trend with bright yellow laces.

Have a nice day :)