
Designing my Formal Dress
With the materials ready, I create a simple sketch of the design I want for my formal dress. There's no need for me to create a fully rendered fashion illustration since I know that there might be a few changes made to the initial design.

With the design in mind, I use the mannequin and some paper to create the pattern for my garment. This was my first time to create my own pattern using a mannequin. So many times, I've imagined the process in my head, yet I wasn't completely confident. I had doubts when I started but by the end of it, I was pleased with the outcome.

After finishing the pattern pieces for both the front and the back of my dress, I laid them down onto the red fabric, pinned them down and cut the pattern pieces. Considering that the mannequin was slightly bigger than me, I didn't add any seam allowance.
I am trying to train myself to create more patterns for every piece of clothing I make since I can use that as a tool to teach myself more advance ways to create garments.
I am trying to train myself to create more patterns for every piece of clothing I make since I can use that as a tool to teach myself more advance ways to create garments.


I usually pin all the fabric pieces on the mannequin first to get a glimpse of the final outcome. Once I'm satisfied, I start sewing all the pieces together. This process can be both fun and frustrating. I am self-taught and a beginner, therefore my sewing skills are still basic.
I can tell you that I created the bodice of the dress about three times. Since the fabric was stretchy, the edges would curl and as I tried to add the gold details, the structure of the top became slightly deformed.
With my initial design, I wanted to add gold sequins on the front of the top. However, when I tried that (I tried three times and failed three times) it came out completely different from how I pictured it in my head. With the consultation of my older brother that "simple is simply better", I decided I'd scrap the sequin idea and create a minimalistic design using only a gold trim
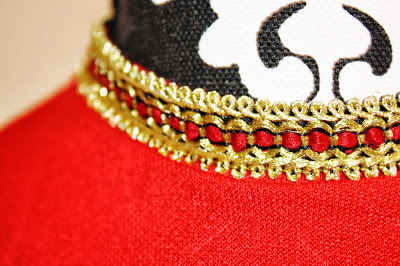

I attached the gold trim to the bodice of the dress and surprisingly, it turned out better. Initially, I draped the trim over the mannequin to create various designs using the material. I still really wanted gold to almost cover the entire top, but in the end I settled for a simplistic design.
Seeing that the material for the skirt of the dress was sheer, I wanted to create another skirt to be placed underneath the dress. So I had to create a pattern and it took me two tries to finalize the pattern and create the tight fitted skirt. The first try was a little too short for my liking. I didn't change it for a while since I became kind of lazy. I had to wait for that burst of inspiration and energy to finally remove the skirt and create another longer skirt for the dress.
 Finally, everything came nicely together. This is only the general idea of the finished dress. There are still some adjustments and other details that I want to perfect.
I will eventually post the dress, but I haven't found the perfect shoes to suit the design, so while I'm still searching, the dress finished, but not quite complete.


I attached the gold trim to the bodice of the dress and surprisingly, it turned out better. Initially, I draped the trim over the mannequin to create various designs using the material. I still really wanted gold to almost cover the entire top, but in the end I settled for a simplistic design.
Seeing that the material for the skirt of the dress was sheer, I wanted to create another skirt to be placed underneath the dress. So I had to create a pattern and it took me two tries to finalize the pattern and create the tight fitted skirt. The first try was a little too short for my liking. I didn't change it for a while since I became kind of lazy. I had to wait for that burst of inspiration and energy to finally remove the skirt and create another longer skirt for the dress.

I will eventually post the dress, but I haven't found the perfect shoes to suit the design, so while I'm still searching, the dress finished, but not quite complete.


